
If you love cheese and like to experiment with new things in cooking, it is natural to dream of making cheese at home. When I made mozzarella cheese myself last year, I fell in love with making cheese. The enthusiasm grew so much that I thought, let’s try making a little old or ‘aged’ cheese!
But I ran into a major problem: I just didn’t have a suitable place in my house to store cheese and age it properly. After a little digging on the internet, though, I came up with a great idea. There is absolutely no need to spend hundreds of dollars on an expensive gadget to store cheese. It is entirely possible to create a wonderful ‘cheese cave’ with a simple mini fridge or an old wine cooler!
This project takes so little time to complete that the only thing that might hold you back is organizing the supplies and the fun part is, most of these things are probably already sitting in your house!
Many people don’t know that you can make an entire, fully-functioning cheese cave with just an old (or new) mini fridge and a few simple extra tools. And besides making delicious cheese at home, what better way to put an unused, dusty fridge to good use, right?
The Perfect Cheese Cave Environment
Before we get into the details, here is a quick look at what we are trying to achieve and how this DIY setup makes it happen:
| Parameter / Requirement | Ideal Specification | How to Achieve with a Mini Fridge |
| Temperature | 50°F to 55°F (10°C to 13°C) | External Temperature Controller (Bypassing internal thermostat) |
| Humidity (RH) | 80% to 95% | Plastic maturation boxes with a damp sponge OR a mini humidifier |
| Air Circulation | Moderate / Daily fresh air | Opening the door for 1 minute daily & using sushi mats / plastic mesh |
Why Our Standard Home Fridge Just Won’t Work
Before we dive into the steps, let’s talk a little bit about the science behind aging cheese (or what the pros call affinage). To get those deep, rich flavors and perfect textures, we need to create an environment that feels exactly like a natural underground cave.
As you can see in the chart above, the perfect sweet spot for a cheese cave requires a temperature of 50°F to 55°F and a relative humidity of 80% to 95%.
Now, think about our regular kitchen refrigerators. They are designed to keep food freezing cold usually around 35°F to 38°F—and the air inside is incredibly dry to prevent food from spoiling. If you put your handmade cheese in there, the aging process will completely stall, and the dry air will make your beautiful cheese wheels crack. That’s why a mini fridge is our perfect savior; it’s compact, and we can easily manipulate its environment.
What You Need to Gather
Like I said, you don’t need any crazy technical skills for this. We aren’t going to tear apart any cooling coils or mess with the compressor wires. Here is everything I gathered for my setup:
- A Mini Fridge or Wine Cooler: An old one sitting in your garage is perfect. Wine coolers are awesome because they naturally run a bit warmer, but a standard mini fridge works beautifully too.💡 Pro-Tip: Try to avoid mini fridges with a built-in small freezer compartment. These freezer boxes build up frost quickly, which can drastically drop the humidity level inside your cave when the fridge cycles on.
- External Temperature Controller: This is the absolute secret weapon. I highly recommend something like the Inkbird ITC-308. It’s super affordable and completely plug-and-play.
- A Digital Hygrometer / Thermometer: A tiny, cheap gauge to tell us the exact temperature and humidity inside.
- A Humidity Source: You can use a small desktop humidifier, or do what I did at first: just a shallow plastic container filled with water and a clean, damp sponge.
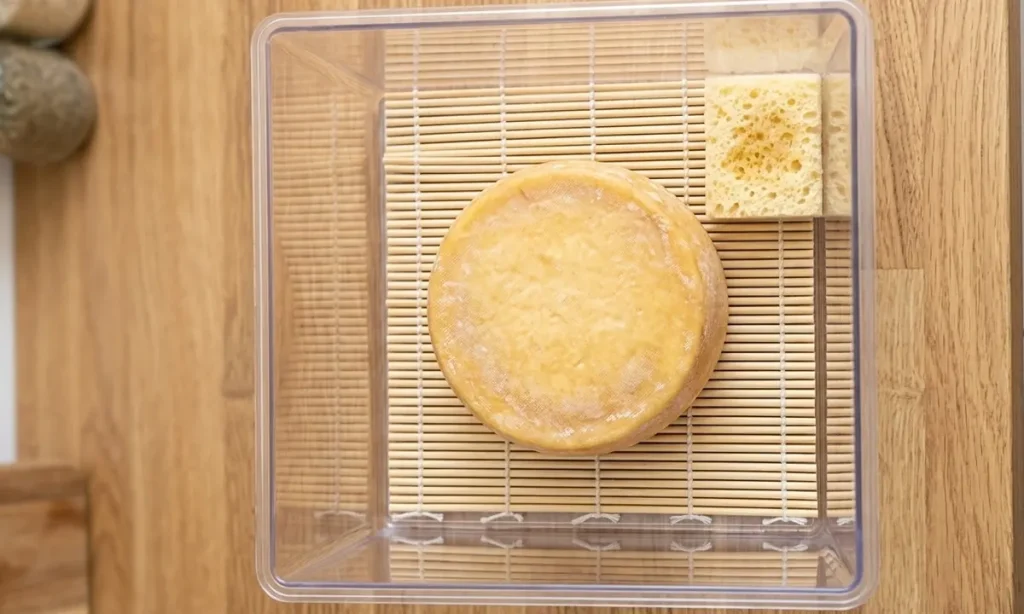
- Plastic Cheese Boxes (Maturation Boxes): Simple food-safe plastic boxes with lids to trap the humidity around individual wheels of cheese.
- Sushi Mats or Plastic Mesh: To place right under the cheese inside the boxes so air can circulate underneath them.
How I Built My Mini Fridge Cheese Cave Step-by-Step
Step 1: Clean and Sanitize Like Crazy
Since we want to grow very specific, good molds and bacteria (like the ones that make Brie or Blue cheese amazing), we cannot let wild kitchen bacteria hijack our project. I unplugged the fridge and scrubbed every single corner inside with a food-safe sanitizer (diluted bleach works too). Then, let it air dry completely.
Step 2: Connecting the Temperature Controller
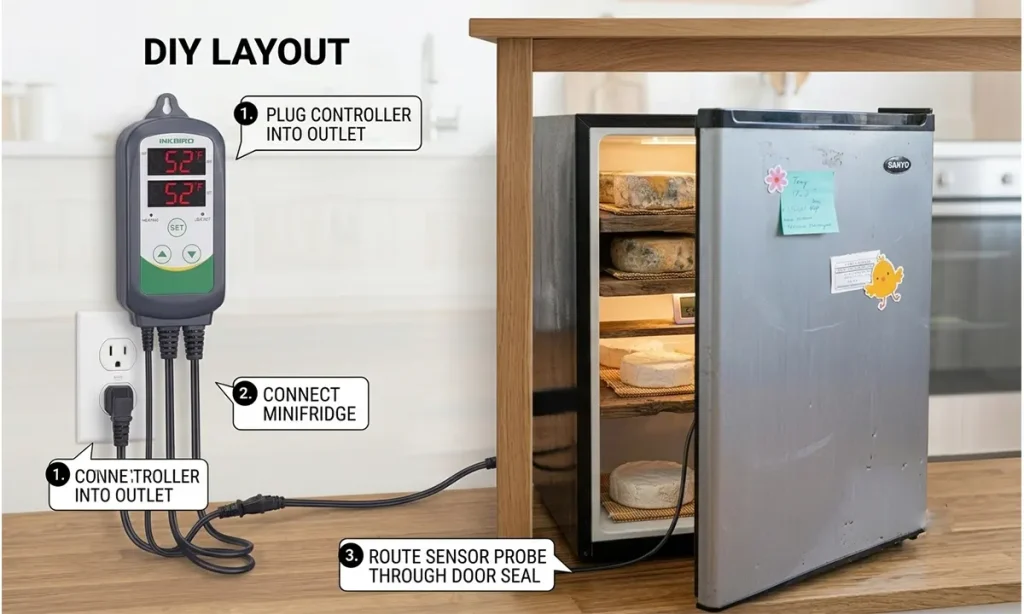
Don’t worry, you don’t need an engineering degree for this. We are basically going to bypass the fridge’s built-in thermostat without cutting a single wire.
- Turn your mini fridge’s built-in temperature dial all the way to its coldest setting.
- Now, instead of plugging the fridge into the wall, plug it directly into the “Cooling” outlet of your new external temperature controller.
- Drop the controller’s wired temperature probe inside the fridge (you can just run it through the magnetic door seal).
- Finally, plug the temperature controller into your wall outlet.
How it works: The external controller acts as a smart power switch. You set it to your desired temperature (say, 52°F). When the inside of the fridge gets warmer than that, the controller turns the power ON to run the fridge. Once it cools down to your target, it cuts the power OFF. This keeps the climate perfectly stable for your cheese!
Step 3: Setting Up the Humidity
Getting a tiny fridge up to 85% humidity can be a bit tricky, but I found two great ways to handle it:
- The Low-Tech Method (Perfect for Beginners): Put your cheese wheel inside a plastic maturation box on top of your plastic mesh or sushi mat. Drop a damp paper towel or a tiny cup of water inside the corner of the box and snap the lid shut. The box will trap the natural moisture evaporating from the cheese, creating its own perfect little micro-climate.
- The Automated Method: If you want a completely hands-off experience, plug a tiny desktop humidifier into a humidity controller and run the wire right through the magnetic door seal of the fridge.
Step 4: The Test Run
Before you risk putting your precious, handmade cheese wheels inside, give your new cave a test drive for 24 to 48 hours. Put your hygrometer inside and monitor the readings. Once the temperature sits steadily between 50°F–55°F and the humidity is locked in your target zone, your cave is officially ready for business!
Understanding the Science of Cheese Aging (Affinage)
While 50°F to 55°F is the golden rule, different styles of cheese require slightly different micro-climates inside your new cave. Keeping them in separate maturation boxes allows you to tweak conditions perfectly:
- Hard Cheeses (Cheddar, Parmesan): They prefer slightly lower humidity (around 80–85%). Your plastic maturation boxes with a slightly loose lid or small ventilation holes work best here.
- Bloomy Rind Cheeses (Brie, Camembert): These beauties need super high humidity (90–95%). Keep their boxes tightly shut with a damp mat to encourage Penicillium candidum growth.
- Blue Cheeses: They love high humidity and need a bit more oxygen. You will need to pierce the cheese wheels with a sterile skewer to let air inside, allowing the blue mold to develop beautifully.
A Few Extra Tips from My Experience
Once your cave is buzzing along, you still need to show your cheese a little love every day:
- Let It Breathe: Good bacteria need oxygen. I make it a habit to open my cheese cave door once a day for about a minute just to let fresh air in and clear out any built-up ammonia gases.
- Flip, Flip, Flip: Especially in the first few weeks, flip your cheese wheels every single day. This makes sure the moisture stays balanced and the rind dries out perfectly evenly.
- Keep an Eye Out for Wild Mold: If you spot an ugly, wild black or fuzzy green mold trying to crash the party, don’t panic. Just take a cloth dipped in light saltwater or vinegar and gently wipe it away.
- Watch the Drips: High humidity means condensation. Wipe down any water droplets forming on the ceiling of the fridge or boxes so they don’t drip onto your cheese and cause wet, rotting spots.
FAQ About DIY Cheese Caves
Can I use a regular freezer instead of a mini fridge?
It is possible, but a mini fridge or wine cooler is highly recommended. Freezers require more energy to stabilize at 52°F, and their heavy cooling cycle tends to dry out the air much faster, making humidity control incredibly difficult.
Can I use a regular beverage cooler instead of a mini fridge?
Yes! In fact, beverage coolers or wine fridges are often better because their built-in temperature range is closer to a cheese cave (usually 45°F to 65°F), meaning your external controller won’t have to work as hard to regulate the power.
How long does it take to convert the fridge into a cheese cave?
The actual setup takes less than 20 minutes once you have all the supplies. However, we highly recommend running it empty for 24 to 48 hours to ensure the temperature and humidity stabilize before adding your cheese.
Can I store different types of cheese together in the same mini fridge cave?
Yes, but keep them in separate plastic maturation boxes! Molds from blue cheese or Brie love to travel through the air, and separate boxes will prevent unwanted cross-contamination.
Why is my cheese cave smelling like ammonia?
A slight ammonia smell is totally normal during the ripening of bloomy rind cheeses (like Brie). However, if it’s overpowering, it means your cave lacks fresh air. Increase your daily “breathing” time from 1 minute to 5 minutes and wipe down any excess condensation inside the box.
How do I clean and sanitize the cheese mats or sushi mats?
Food safety is crucial! Always boil your plastic mesh or bamboo sushi mats in hot water for at least 10 minutes and let them dry completely before putting a new cheese wheel on them to prevent bad bacteria growth.
My Final Thoughts
Turning an old mini fridge into a personal DIY cheese cave has been one of the most fun and rewarding weekend projects I’ve ever done. It completely changes the game and gives you total control over your food, letting you age cheese exactly like the traditional masters have done for centuries.
So, if you’ve got an unused fridge just sitting around losing its life, dust it off, grab a controller, and get ready to taste the absolute best aged cheese you’ve ever had made completely by you, right at home!
Have you ever thought about making your own cheese cave? What is the very first aged cheese you are dreaming of making? Let me know in the comments below!

Hey, I’m MD BELAL! I’m the founder and appliance lover behind FridgeFAQ.com. Over the last 5 years, I’ve spent countless hours fixing cooling issues, optimizing temperatures, and turning ordinary mini fridges into fun DIY projects. I started this site to break down complicated fridge problems into simple, friendly advice so you can save money and fix your own appliances with confidence!